How to improve efficiency with key NetDocuments features part 2 of 2: Automating processes for more efficiency
If you read part one of this series ,you’re now informed on how to make minor tweaks to your workflow that will save you clicks —adding up to big time-savings.
Now it’s time to kick things up a notch and tackle broken processes. In part two, I share more significant changes and how you can take advantage of NetDocuments to adopt a new, smarter way of working to accelerate processes.
Document Tracking
As discussed in part one, saved searches are a great way to skip clicks when you find yourself repeating an identical search. But, saved searches can also make it easier to track documents and other work as they move through your organisation. For example, if your process includes an approval requirement for invoices related to client disbursements, you likely need someway to track the status of each invoice. This can be handled nearly automatically through a series of saved searches.
How to Implement Document Tracking with Saved Searches
- Add searchable profile attributes to your documents. You may need to track the date received, an invoice’s status, the attorney who needs to review it, and a due date. The date received and the due date are simple date attributes, while the invoice status and the reviewing attorney will be text attributes with a short list of choices. This could mean labelling an invoice status as Received, Entered, Approved, or Paid; and attorney reviewer could be a list of each attorney in your organisation.
- Update the status as the document moves through departments. When an invoice is received and scanned or saved to NetDocuments the date fields should always be completed with a set invoice status of Received. Once accounting enters it into their system, they should update the status to Entered and add the attorney to the Attorney Reviewer field. Once the attorney approves the invoice, accounting should change the invoice status to Approved. Finally, accounting changes the invoice status to Paid once it is completed.
This might sound like a lot of work, but it is much simpler than the alternative of sending emails back and forth across your organisation for status updates. With a series of saved searches that combine the power of specific profile attributes and date ranges, anyone in the organisation can track the status of an invoice as it moves through your organisation.
Dynamic Attributes
Dynamic Profile Attributes improve efficiency by allowing you to enter data when (and only when) you need it by showing attributes only when certain conditions exist. In the example above, dynamic attributes were used to track the invoice throughout its lifecycle.
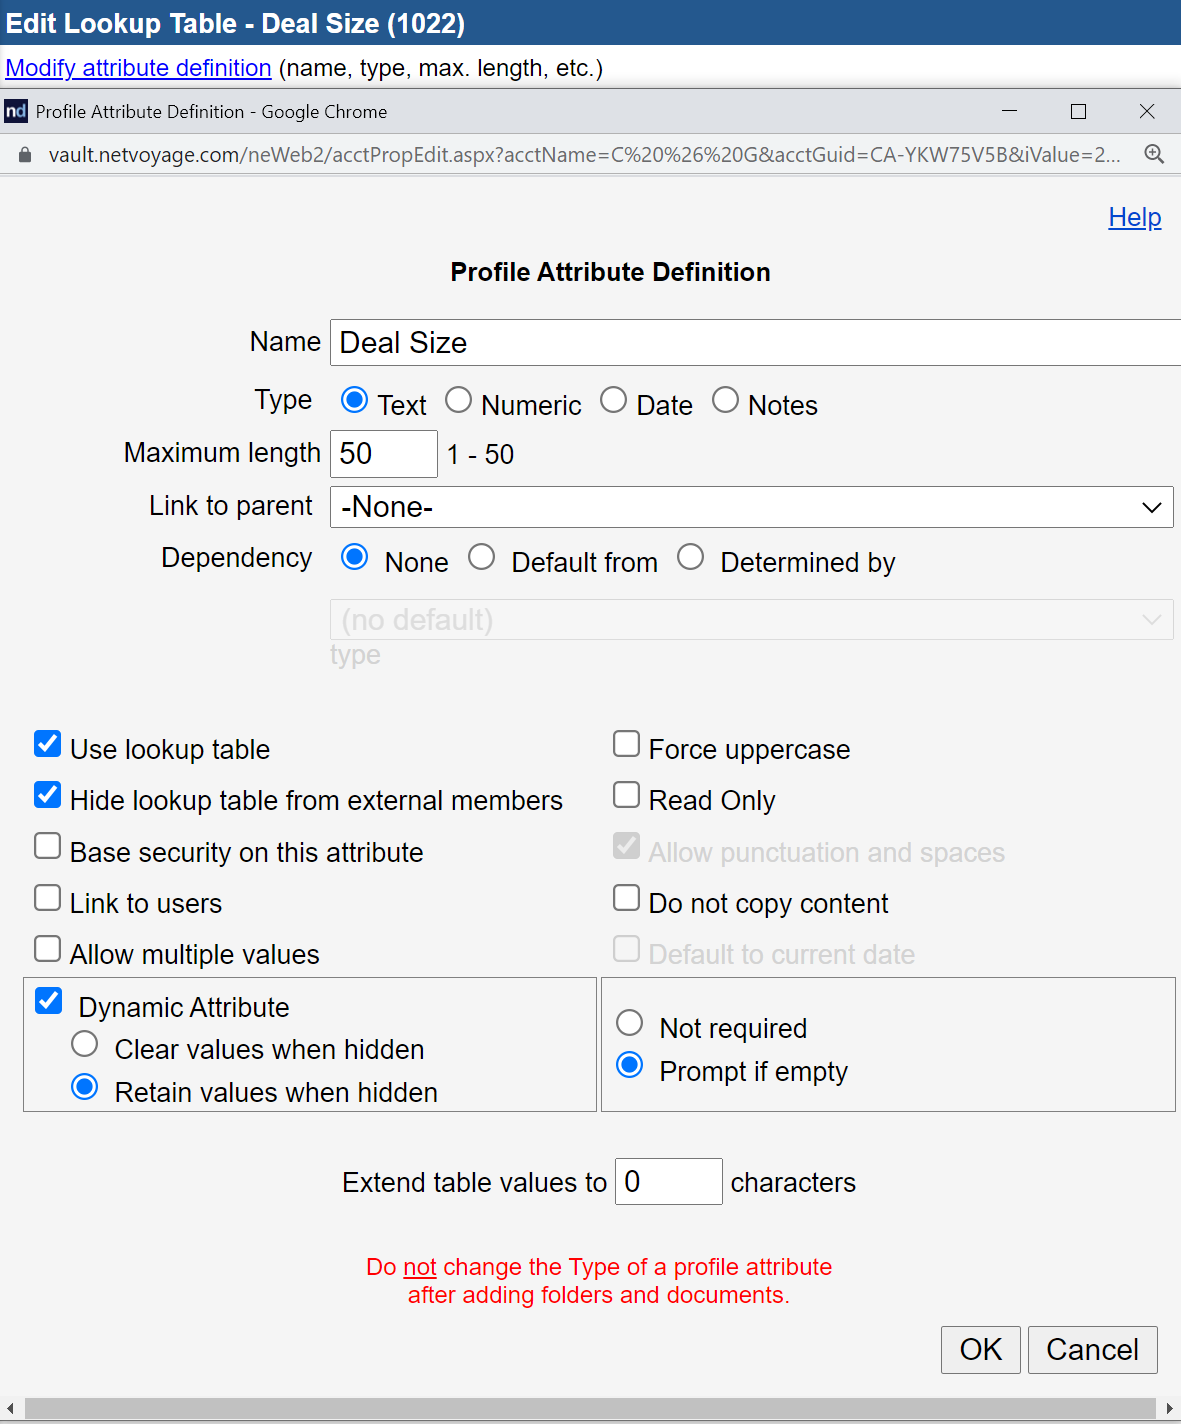
Dynamic attributes are created in the same way as any other attribute and—like any other attribute— can be text, date, use a lookup, etc. The key is to choose the dynamic option when creating the attribute. The ID number of the attribute will also need to be noted. Consider this example:

In this case, the Invoice Status attribute is flagged as dynamic (1) which tells NetDocuments that I only want to see it under certain conditions, configured as a text attribute that uses a lookup table (2), and I took note that it is profile attribute number 1084 (3).
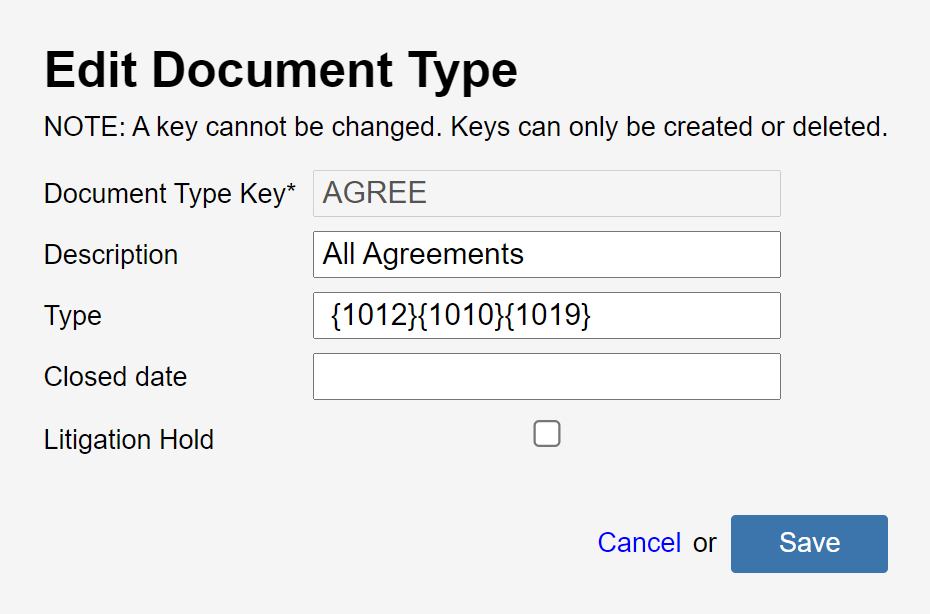
Once your dynamic attributes are created, it’s time to define when they appear. This is done by updating the Type field of the controlling value. Enter the attribute numbers in {braces} in the order you would like them to appear. In the image below, I have told NetDocuments that I want four dynamic attributes to appear whenever the Invoice – Disbursement document type is selected. Those dynamic attributes are entered as “{1083}{1084}{1085}{1086}” where {1083} is Invoice Received Date, {1084} is Invoice Status, {1085} is Invoice Reviewer, and {1086} is Invoice Paid Date.

In my opinion, dynamic attributes are one of the keys to using NetDocuments effectively and can revolutionise the way you work by providing information only when and where you need it, thereby decreasing the number of decisions you must make throughout the day.
Creating Workspaces
Organization within NetDocuments is centred around workspaces which offer built-in matter organisation. Within a workspace you may add folders and saved searches to further organise your files so everything is at your fingertips.
If I told you that that creating workspaces is difficult for some organisations, you might wonder what I am talking about. Most end-users never see them get created. They ask for or add a new matter to their practice management or billing system and a matching workspace is automatically created via these system’s integration with NetDocuments. Even without a direct integration, the free ndLink utility can create one. Law firms almost always utilise one of these two options. However, other types of non-legal environments such as corporate legal departments may not use the same practice management tools as their law firm counterparts, leaving many of these businesses struggling to find an efficient way to add workspaces.
There are at least three ways to add workspaces without an integration or an application that can support ndLink; however, some are more efficient than others:
- Have a repository administrator create a new entry in the lookup table of the appropriate profile attribute. The problem, of course, is that your repository administrators might have to spend a lot of time doing this, which I do not recommend.
- Populate a lookup table by uploading a comma separated variable (.csv) file. This can be done by both administrators and a select group of non-admin users. The problem with this method is that it works best with a common spreadsheet that must be saved locally which can create timing conflicts as multiple users try to update the spreadsheet and upload it.
- Take advantage of the NetDocuments API. You could program something on your own, but it is much easier to utilise one of the third-party tools already built for this purpose. Two possibilities are One Step Workspace and mot-r creator. Both tools allow any group of users administrators designate to create workspaces in any cabinet they have access to, and both are surprisingly affordable. If creating workspaces is an issue for your organisation, I highly recommend you check out these tools.
- Put Microsoft Power Automate to work. Access to Microsoft Power Automate is available to NetDocuments customers who have a subscription to Microsoft 365. Using the NetDocuments connector with PowerAutomate, technology professionals can tie into NetDocuments’ automated workspace creation tool, which can be set up to create an approved workspace after a user completes a new matter intake process or request.
Automating Workflow
As we think about NetDocuments’ open API, it’s time to discuss third-party tools that can enhance your experience with the platform.
As I write this article, there are currently 127 applications listed in the NetDocuments App Directory. These tools range from the workspace creators I mentioned previously to a list of practice management systems with built-in links. If you are looking to take your use of NetDocuments to the next level, I encourage you to see what is out there.
Here are some places to start:
- SignatureBridge provides a link between NetDocuments and DocuSign. The COVID-19 pandemic has accelerated the trend toward electronic signatures and SignatureBridge allows you to route documents and monitor status in NetDocuments.
- A quick search tells me that at least 20 of the applications in the directory relate to contract management. If your organisation spends a lot of time drafting contracts, especially within a corporate legal environment, it can be a real challenge to keep track of contracts, who is working on them, and when they need to be renewed. An integrated contract management tool helps you stay on top of this information within NetDocuments.
Accelerate Efficiency with NetDocuments’ Built-in Tools
Finally, there are several NetDocuments tools that save time and boost efficiency right within the platform.
ndMail
ndMail’s core benefits begin with predictive email filing. Instead of navigating to a workspace and saving an email, ndMail predicts a location for you.
Except, that last sentence does not do it justice.
ndMail is remarkably good at predicting where an email should be filed, and with a single click you can file that message and all subsequent messages in the same conversation if desired. Using artificial intelligence, it looks at every part of the email including the recipient(s), sender, subject and body of the email. It can also recognise text, names, number patterns and other information and matches them against patterns in previously saved emails as well as locations within NetDocuments.
For example, if your matter number is ABC123 and the email includes this information anywhere, ndMail is very likely to predict that matter as the filing location even if it is the first email received on the matter. If it does not predict the correct location, you can take a moment to manually file the email and it will learn from this your behaviour—and that of everyone across your organisation.
The predictive email filing included with ndMail saves an enormous amount of time, but that is not all it does. It also includes a folder mapping feature that allows you to map an Outlook folder or subfolder to a NetDocuments location. To file an email, simply drag it from your Inbox to the folder. Finally, it provides a panel in Outlook that offers you instant access to NetDocuments in a view similar to ndOffice, embedded entirely within Outlook.
ndMail is a game changing tool for your workflow by bringing the DMS to many lawyer’s favourite place to work: their email.
SetBuilder
SetBuilder was created to save you time by streamlining how you gather and organise documents in a binder or a document set. A set can be created from scratch or by copying an existing set. Once a set is created you can add documents from the same workspace or from your local computer.
SetBuilder includes the ability to add additional organisational elements. For example, you can add section headers and placeholders to the set to help you quickly identify which documents are completed and which are still in motion. All of this is done in a clean, graphical interface where you drag and drop items into your desired order.
SetBuilder is most useful for creating closing binders for any sort of transaction. The tool helps you assemble all of your files in a digestible, orderly format.
Real estate closings, business formations, and estate plans are just a few of the practice areas where SetBuilder can play a big role. If you work in one of these areas, you are probably already creating binders like this. Why not do it in the most efficient way possible by creating them in the same place the documents already reside?
CollabSpaces
In their simplest form, CollabSpaces allow you to create what many of us still refer to as ‘client portals.’ In other words, you can create an area within NetDocuments where a client or external user can access documents. You control whether they can simply view the documents you place there, download existing documents, upload new ones, or modify things that are already in the CollabSpace.
However, CollabSpaces are more than a simple client portal. They can be used to collaborate with expert witnesses or outside counsel, and are very useful in complex matters where you need to collect and organise a subset of matter documents such as when conducting a specific deposition or responding to a request for production. The great thing about CollabSpaces is it allows you to collaborate while controlling how it happens. You control not only access to the CollabSpace but how those with access can work in the CollabSpace.
NetDocuments requires an external user license. You can check how many external users your account is allowed on the Information and Settings admin page. If you do not have access to CollabSpaces or need more External Users, contact your NetDocuments representative for more information.
Conclusion
I hope you have enjoyed this two-part series on NetDocuments workflow where I’ve highlighted two ways to enhance your workflow by first, taking advantage of seemingly small improvements in the way you use a product like NetDocuments; and second, looking for ways that a modern product like NetDocuments can change your workflow for the better.
Multiplying a few saved clicks across an entire organisation and leveraging this modern technology to speed work can have a massive impact on efficiency and product adoption. And what it cannot do on its own, it may be able to do in conjunction with another third-party product.
Ready to take your workflow to the next level? Affinity Consulting can help you implement NetDocuments for the first time or optimise your existing NetDocuments workflow. Learn more here.


